
Biscoff Cheesecake Pops: Irresistible 10-Step Cookie Butter Treat
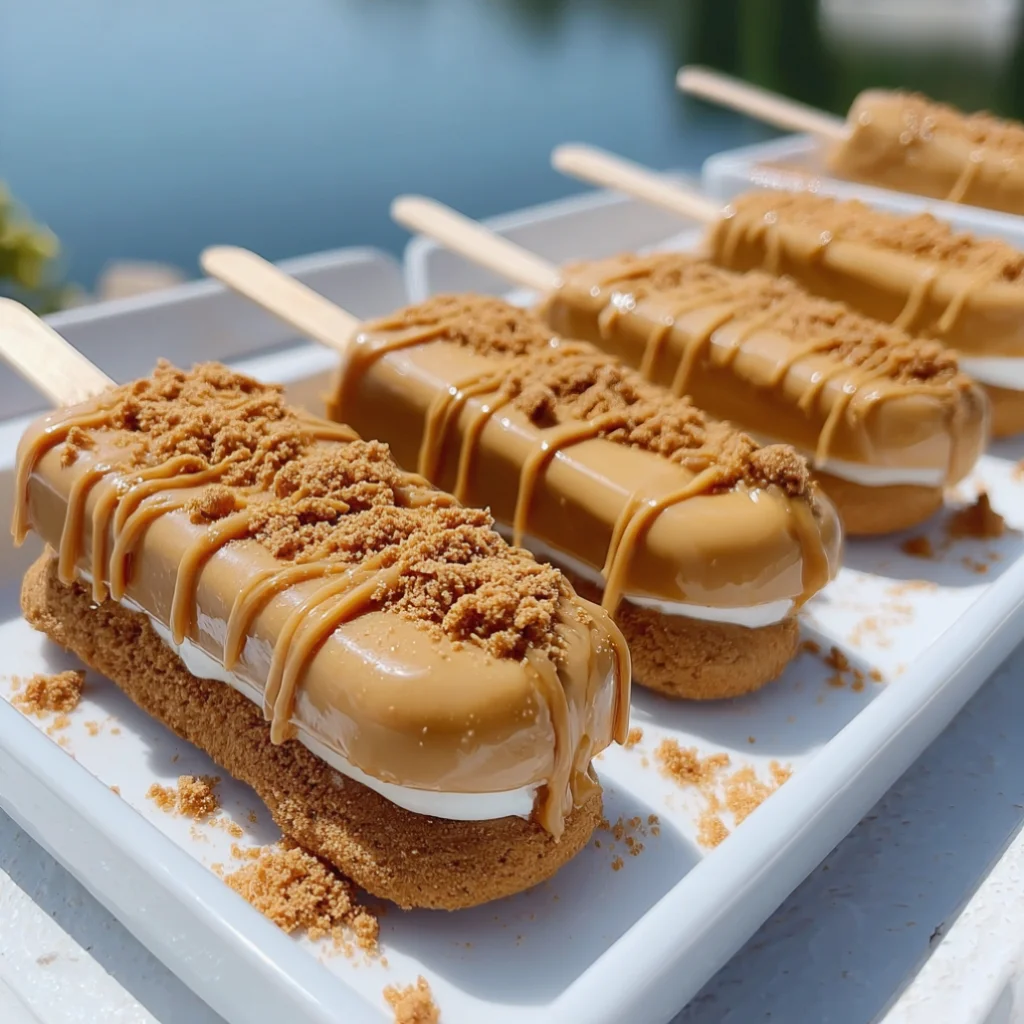
Are you ready to dive into a sweet, creamy delight that combines the flavors of cookie butter with the irresistible charm of cheesecake? Biscoff cheesecake pops are the perfect no-bake dessert that is easy to prepare and guaranteed to impress at any gathering. These bite-sized cheesecake treats bring together the unique cookie butter flavor of Biscoff cookies and the rich creaminess of cheesecake, all while being beautifully presented as pops. Let’s get started on this delightful recipe!
Ingredients
- For the Cheesecake Filling:
- 1 cup Biscoff cookie butter – Look for high-quality, smooth cookie butter for the best flavor. Brands that are 100% natural are preferred for a robust taste.
- 8 oz cream cheese, softened – Full-fat cream cheese will yield a creamier texture. Make sure it’s at room temperature for easier mixing.
- 1/2 cup powdered sugar – This helps to sweeten the mixture without adding granularity. Sift it if clumps are present to ensure a smooth mixture.
- 1 tsp vanilla extract – Pure vanilla extract enhances the overall flavor profile. Avoid imitation extracts for a more authentic taste.
- 1 cup whipped cream – Use homemade or store-bought; ensure it is light and airy for the best texture. If using store-bought, choose a brand with no artificial ingredients for the best flavor.
- For the Coating:
- 1 cup Biscoff cookie crumbs – You can crush whole Biscoff cookies in a food processor or use pre-made crumbs. For a finer texture, pulse briefly and avoid over-processing.
- 1 cup chocolate chips (milk or dark, based on preference) – Choose high-quality chocolate for a rich coating. Consider using a mixture of both for balanced sweetness and depth of flavor.
- 1 tbsp coconut oil (optional, for a smoother chocolate coating) – This will help the chocolate coat evenly and smoothly, giving it a glossy finish.
- For Assembly:
- 10-12 popsicle sticks – Choose sturdy sticks to support the pops effectively. Look for food-safe options that will hold up during the dipping process.
- Silicone mold or paper cups – Silicone molds make it easier to pop out the cheesecake after freezing. Paper cups can be used but ensure they are sturdy enough to hold the filling.
Steps / Instructions
- Prepare the Cheesecake Mixture: In a large mixing bowl, combine the softened cream cheese and Biscoff cookie butter. Use an electric mixer to beat the mixture until smooth and creamy, about 2-3 minutes. The mixture should be free of lumps and have a velvety texture, which is crucial for the perfect Biscoff cheesecake pops.
- Add Sweetness: Gradually add the powdered sugar and vanilla extract to the cream cheese mixture. Beat on low speed until combined, then increase the speed to medium and mix until fluffy. This should take about 2 minutes; the mixture will become lighter in color and texture, indicating it’s ready for the next step.
- Fold in Whipped Cream: Gently fold the whipped cream into the cheesecake mixture using a spatula. Ensure there are no lumps for a smooth consistency. The goal here is to maintain the airiness of the whipped cream, so be careful not to over-mix. The final mixture should be light and fluffy, perfect for forming into pops.
- Fill the Molds: Spoon the cheesecake mixture into silicone molds or paper cups, filling each about three-quarters full. Tap gently on the counter to eliminate air bubbles, ensuring a perfect pop shape. This step is essential as bubbles can ruin the smooth appearance of the pops.
- Insert Sticks: Place a popsicle stick into the center of each filled mold, ensuring it stands upright. If using paper cups, you may need to freeze them for about 30 minutes to set slightly before inserting the sticks, which will help them stay in place without sinking.
- Freeze the Pops: Cover the molds with plastic wrap or lids and freeze for at least 4 hours, or until completely solid. For best results, let them freeze overnight; this ensures that the pops will hold their shape when removed.
- Prepare the Coating: In a microwave-safe bowl, combine the chocolate chips and coconut oil (if using). Microwave in 20-second intervals, stirring in between, until melted and smooth. The chocolate should be glossy and not too hot to touch, as overheating can cause it to seize.
- Dip the Pops: Remove the cheesecake pops from the molds. Quickly dip each pop into the melted chocolate, allowing excess to drip off. Make sure to coat the pops thoroughly for an even chocolate layer; this step is critical for both flavor and presentation.
- Coat with Crumbs: Immediately roll the chocolate-dipped cheesecake pops in the Biscoff cookie crumbs, ensuring they are well-coated. This adds both flavor and texture, making each bite delightful. Press gently to adhere the crumbs well.
- Chill Again: Place the coated pops on a parchment-lined tray and return them to the freezer for about 30 minutes to set the chocolate coating completely. This final freeze helps the chocolate harden, giving a satisfying crunch when bitten into.
Tips & Tricks
For the best results when making Biscoff cheesecake pops, consider the following tips: You can learn more about this topic.
- Ingredient Quality: Use high-quality cream cheese and cookie butter for a rich and creamy flavor. The better the ingredients, the more delicious your cheesecake pops will be. Fresh ingredients make all the difference in a dessert.
- Make-ahead: These pops can be made a few days in advance. Just store them in an airtight container in the freezer until you’re ready to serve. This is perfect for parties or gatherings where you want to prepare ahead of time and enjoy more time with your guests.
- Consistency Check: Ensure the cheesecake mixture is smooth and well-combined before filling the molds to avoid any lumps in the final product. A smooth mixture guarantees a pleasant mouthfeel that enhances the overall experience of the Biscoff cheesecake pops.
- Chocolate Coating: For a shiny finish, ensure the chocolate is well tempered, and allow pops to set completely in the freezer. This will prevent the chocolate from cracking when bitten into and gives a professional appearance.
- Common Mistakes: Avoid over-mixing the cheesecake mixture after adding the whipped cream, as this can deflate the airiness. Gentle folding is key to keeping the pops light and airy. Always remember that less is more when it comes to mixing at this stage.
Variations
Feel free to customize your Biscoff cheesecake pops with these creative variations: Check out our related guide for more tips.
- Flavor Infusions: Add a hint of cinnamon or nutmeg to the cheesecake mixture for a spiced flavor profile that complements the Biscoff cookies perfectly. A touch of espresso powder can also add depth to the flavor.
- Healthier Option: Substitute reduced-fat cream cheese and sugar-free chocolate chips for a lighter treat that still satisfies your sweet tooth. Adding Greek yogurt can also enhance creaminess while reducing calories.
- Different Toppings: Experiment with crushed nuts, sprinkles, or caramel drizzle on top of the chocolate coating for an extra layer of flavor and visual appeal. These toppings can elevate the presentation and add crunch to the texture.
Serving Suggestions
Present your Biscoff cheesecake pops in a fun way for parties or gatherings:
- Display: Arrange the pops in a decorative mason jar or a popsicle stand for an eye-catching display that draws attention. This can be a great conversation starter.
- Pairing: Serve alongside a scoop of vanilla ice cream or a warm cup of coffee to balance the sweetness. These pairings elevate the dessert experience and make it a delightful treat for all.
Biscoff Cheesecake Pops
Irresistible no-bake dessert combining cookie butter and cheesecake flavors, presented as pops.
Ingredients
- 1 cup Biscoff cookie butter
- 8 oz cream cheese, softened
- 1/2 cup powdered sugar
- 1 tsp vanilla extract
- 1 cup whipped cream
- 1 cup Biscoff cookie crumbs
- 1 cup chocolate chips (milk or dark)
- 1 tbsp coconut oil (optional)
- 10-12 popsicle sticks
- Silicone mold or paper cups
Directions
In a large mixing bowl, combine the softened cream cheese and Biscoff cookie butter. Use an electric mixer to beat until smooth and creamy, about 2-3 minutes.
Gradually add the powdered sugar and vanilla extract to the cream cheese mixture. Beat on low speed until combined, then increase to medium speed and mix until fluffy, about 2 minutes.
Gently fold the whipped cream into the cheesecake mixture using a spatula until smooth and fluffy.
Spoon the cheesecake mixture into silicone molds or paper cups, filling each about three-quarters full. Tap gently to eliminate air bubbles.
Place a popsicle stick into the center of each filled mold, ensuring it stands upright.
Cover the molds and freeze for at least 4 hours, or until completely solid.
In a microwave-safe bowl, combine the chocolate chips and coconut oil (if using). Microwave in 20-second intervals, stirring until melted and smooth.
Remove the cheesecake pops from the molds and dip each pop into the melted chocolate, allowing excess to drip off.
Roll the chocolate-dipped pops in the Biscoff cookie crumbs to coat.
Place the coated pops on a parchment-lined tray and return them to the freezer for about 30 minutes to set the chocolate.
Recipe Reviews
- ★★★★★
Excellent recipe!
Leave a Reply
Your email address will not be published. Required fields are marked *


Excellent recipe!